Monday, December 14, 2009

RISE to the Occasion


Here's the poster for my next gallery show. It will be a diverse mix of art and craft. Rise Photographic Gallery is right here in South Portland, near where Elm Street intersects Broadway. A portion of the proceeds will benefit Big Brothers Big Sisters of Southern Maine.


I'll have a few pieces of furniture in the show, along with gift items like these charming rolling pins. These are curly maple with green milk paint.


These clam stools with green legs are pieces that I just finished for the show. They have white oak seats and painted maple legs. If you're near South Portland and free Friday night, please stop-by the opening.

Monday, November 30, 2009

Holiday Sale


This Friday and Saturday, I'll have a booth at the SEA Holiday Sale. If you're free, please join me to see my new work and a wide array of unique gifts. Please click here for a list of participating artists.

thanks, Peter

Tuesday, November 17, 2009

I love pie!


A couple years ago, our old rolling pin with the red handles started to fall apart. I made a rolling pin, similar to these, to replace it. These are native hard maple, displaying both heart and sapwood and have green milk paint in the small coves at each end. I turn each one to its diameter, sand and cut a small cove at each end, then turn off the lathe. I rotate the piece by hand to apply the milk paint to both coves. The pin comes off the lathe and I chop both ends to remove any trace of its having been attached to the lathe. Finally, the edges are sanded smooth, prior to 2 coats of walnut oil.


I call them green pins because of the green milk paint and because the maple is native and fairly local. The red handles of the old pin gave me the idea of adding some color to the ends.


This batch is curly, soft maple. They're all about 1 3/4" in diameter and about 18" long. With my palms on the pin to roll, I feel the dough respond to my movements. The length of the pin makes it easy for me to transfer the rolled dough to its pan.


I ask $32.00 per pin plus about $5.00 to $10.00 for shipping, depending on how far away you are. Please contact me here for more information. Green pins were just featured on a blog dedicated to exploring and highlighting flavor. Please go to www.flavorista.com for more. Pie is Good!


Wednesday, September 23, 2009

Work of the Hand, 20th year


Welcome to the Center for Maine Contemporary Art in Rockport, Maine. In early October, I'll be exhibiting in their 20th annual Work of the Hand, craft show. Please click here for more about the show. I'll be there Friday evening for the opening as well as volunteering Saturday morning. Approximately 50 fine crafts artists will be showing.

Tuesday, September 15, 2009

Furniture Masters' Auction


This Sunday, September 20th, is the annual Furniture Masters auction. This year it's in Manchester, NH, at The Currier Museum of Art. Our silent auction and reception go from 6 - 7:15 pm. The live auction starts at 7:30. This ash, hickory and Danish cord bench is my offering for this year's auction. To see all of this year's pieces, please click here.


On Friday, Saturday and Sunday the 20th, the Currier will be offering programs related to the Furniture Masters and the auction pieces. For more information on the tours, slide shows and demonstrations, please click here. This is an opportunity to see some wonderful furniture and the auction is great fun.

Thursday, September 10, 2009

Ryan's Blanket Chest


I recently discovered that Bessey makes these angled clamping pads to fit their K-Body REVO clamps. They offer plenty of clamping power without a hint of slipping. They tilt from 0 to 15 degrees and saved me from having to make a set of angled cauls.


I had to make 2 small cauls to focus pressure at the ends of the lid divider.


With everything glued and cleaned-up, I can rout for the hinges and attach the lid. This shot shows the wedged through tenon for one foot. The frame and panel bottom goes in later.


I did a little splicing, attached the eye straps and now it's off to my friend Carl for stain and a lacquer finish.


The finish is 2 coats of stain and crystal lacquer. This color corresponds to the color of 2 lamps in the room that this chest will call home.


Wednesday, July 8, 2009

Laying-out angled through dovetails


This is the front of the lid of my blanket chest. Its ends are angled at 18 degrees. I remembered reading that angled dovetails need to be centered along a line that is parallel to a long edge. Laying-out off the angled end can lead to short grain problems at the tips of your tails. I start by striking a base line.


Using my small double square, I draw the centerlines of the sockets for the full pins.


I center the width of the base of the socket where my pencil line meets my base line.


For the top of the socket, I center its width where the pencil line meets the angled edge. I chose to make my sockets 3/8" at the bottom and 3/16" at the top. These measurements echo the pins in the chest.


I set my bevel gauge to connect the dots. You'll need a second gauge because the other side of the pin is at a different angle. With all the sockets marked on this side, you can square your lines across the end then angle them down the opposite face.


After sawing and paring, here's a finished end showing the 3 tails. If you cut a scrap to the same angle and lay-out typical dovetail as you would if the end were square, the difference will be clear.

Sunday, July 5, 2009

Back at it


Here's the first of 2 photos of the bench that I built back in April. This one adorns my latest batch of postcards. This was shot by Dennis Griggs. Dennis shot all the photos in my portfolio.


This one was shot by Bill Truslow. Same piece but very different effect. This photo will be included in the catalog for this year's Furniture Masters auction. I love the way his lighting has worked its way through the woven seat and into the shadow.


This is a drawing of a blanket chest that I'm working on currently. Carol Bass designed it for clients of ours who have the live-edge trestle table in my portfolio. This was an early drawing and the feet ended up being from one piece. The box will be stained blue-green and the curly maple feet will remain their natural color.


Here's my progress, so far. In my next post I'll show how I laid-out the lid's angled dovetails.

Thursday, May 14, 2009

Pecha Kucha Night - Portland


I'll be presenting, Thursday evening, May 21st at SPACE gallery, 538 Congress St., Portland, Maine. Doors open at 6:30, presentations begin at 7:20; $5.00. There will be about 10-12 presenters, each will offer 20 slides and speak for 20 seconds about each one. For more about this perfect concept, please click here. For more about SPACE, please click here.

I'll be revealing the secret of where ideas come from. Also, how this table ...


turned into this table ...


and how this blank ...


turned into one of these legs.


I hope to see you there.

Friday, May 1, 2009

Our Evening at the Masonic Temple


Morrigan came and helped me set-up. Colleen joined us once the event had started. This photo shows the display I pulled together for the evening. I borrowed the 10 1/2' riser and repainted it with this robin's egg blue that came from the "mis-tint" table at our local Maine Paint Store. I was lucky, at 1/10 the cost I found the exact color I was after. One of the sample legs, behind the far end of the bench, is painted to simulate a candlepin. 


The evening was sponsored by The Maine Center for Creativity. One of their larger projects is the design competition and execution of painting 16 oil tanks in Portland. For more please click here. Morrigan took this arial photo of the model of the project that was on display. The roadways in the photo represent I-295 as one approaches Portland from the South. 

Tuesday, April 28, 2009

Thursday, April 23, 2009

Nicely written profile

The day I returned from the show, photos were taken in my shop for an article that appeared in the 4/5 edition of the Maine Sunday Telegram. Bob Keyes, staff art editor, did a wonderful job in assembling our conversations into a very positive article. To go to the article, please click here.

thanks, Peter

Tuesday, March 24, 2009

Off to the Show


Here's the glue-up of the frame. It looks like an ad for Bessey clamps.


Time was tight in the final phases so I missed photographing how the rockers went on. They are mounted in their slots and pinned in place using a 3/16" diameter, straight grained dowel that I make. This is the final shot of the finished rocker with its seat in place. I leave for the show tomorrow at lunchtime. Wish me luck.

Thursday, March 19, 2009

Home stretch


This is the first dry-fit with all the rungs, arms and the front and back in place. The cauls are mounted on a 1/4" MDF base and are cut to an angle that compliments the angled sides. This gives me square, parallel surfaces for the clamps. 


Before disassembly, I rest the curved backrest blank on the top of the back legs to catch the angle for its mortise. 


This is the last dry-fit before glue-up. I cut the slots for the rockers and shaped the tops of the legs and backrest. Here I'm checking the fit of the backrest in its angled mortises.

Thursday, March 12, 2009

Break-neck pace


I'm marking the sides of the shallow sockets. This face is rounded so I cut a shallow socket to bear against the end of the rung. I use the flat face of the leg to register the blade of my double square. The thickness of its body gives me an offset straightedge that locates the sides of my socket. 


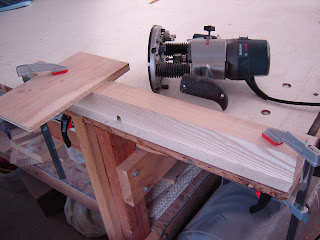
I use 2 identical routers, with different bits. One to cut the socket then another for the deeper mortise.  This shot shows a leg with its joinery completed for this face. I use a 5/8" bit to cut the sockets. This 5/16" bit cuts the mortises. I work from the flat top against a stop to locate my heights.


All the rungs are milled slightly oversized in both width and thickness and given a centered mortise.


Fitting begins with shaping the top to match the socket and adjusting thickness to tight. Here I butt the top of the rung against the top of the socket and mark the bottom of the rung on the leg. This outline shows me where the rung is larger than the socket and where I need to remove material. 


Prior to fitting each arm I need to glue together its 2 pieces. These came out of the same board. Its thickness was the width of the rung. I rip off the rung, then re-saw the offcut to get the thiner wing. Then the finished arm looks as if it were shaped from a single piece.  

Thursday, March 5, 2009

Rocker legs


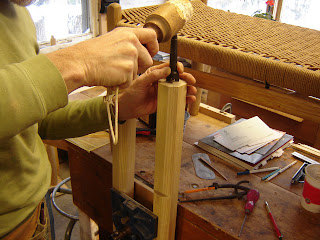
I recently sent off an article about making the leg in the vise. This is the first time that I took the photos for an article. I got good at using my tripod and the camera's timer. This is what my bench looked like after the last shot.


Now I can continue with the rocker. I've milled my leg blanks, routed cross-grain, and knocked off the corners. This makes turning a bit easier but I think I do it for the kindling.


Here I am readying the blanks for the lathe. On my workbench, we can see the bowling bench is back with its slick, freshly woven seat. 


This is a typical timer shot. We can see the chips flying and a fully-turned leg in the back.